Sunday, January 26, 2014

Wedding Day Beauty DOs and DON'Ts, to Future Brides from a Former Bride

Hello ladies!

If you just recently got engaged, CONGRATULATIONS! It is such an exciting time, and I'm sure your head is swirling with all kinds of wedding-related stuff :)

Today I'm going to share some of my tips based off of what I experienced on my wedding day.
Here are a couple of photos showing how my makeup looked:


Pretty, right? My makeup was done at Roxy's Beauty Bar in Bay City, Michigan. They are simply amazing. Lauren was the coolest artist to work with! :)

So here we go!

DO let someone else do your makeup. Trust me, between the wedding day nerves, excitement, and even stress, you're not going to be able to stay still long enough to do your own makeup. Trust the professionals, because they have the HD cosmetics and tools that will make you look absolutely flawless.

DON'T go without some type of false lash. Sure, your natural lashes might look perfectly fine in the mirror, but when it comes to photographs, both your eyebrows and eyelashes disappear. So please, put some kind of false lash on. They don't have to be dramatic, just enough to enhance your natural lashes.

DO moisturize and prime your face! Some airbrush makeup kits that professional artists use include an airbrush moisturizer. Allow them to prep your face so that your foundation stays on all day.

DON'T exfoliate your face or use a deep-cleansing mask the night before the wedding. This is basically like an open invitation for breakouts and large pores. It's truly amazing what your skin is capable of overnight, good or bad. Just let your face breathe on it's own the night before.

DO drink plenty of water, as early as a week or two before the wedding, AND on wedding day! This will plump up your skin and purify it so that it can handle all of the glam. Also, if you're having a summer wedding like I had, you will be BEGGING for water anyway!

DON'T try anything too crazy. Everyone has a comfort zone when it comes to makeup. Let your makeup artist enhance your natural beauty. Otherwise the groom won't even recognize you! Also, don't rock the acrylic nails if you don't normally wear them. I opted for Essie Nail Lacquer in Ballet Slippers. It was a nice natural color that looked so pretty with my dress.

DO schedule at least 1 trial/run-through. It is absolutely necessary. This allows your makeup artist to apply the makeup on your face, and it allows you to tell him/her what you don't like, so that they can correct it for wedding day.

DON'T rock a red lip without learning how to make it last all day. You're going to have to reapply it. You're going to need a good lip liner, baby powder, and a powder brush. Apply your liner and lip color as desired. Then sweep a veil of baby powder on the lips with the brush. Then apply another coat of lip color. Then blot the excess with a tissue. This should give you a good 6 hours. But remember that you and future hubby will be doing lots of smooching, so if you're going to commit to the red lip, know what you're signing up for! ;)

DO set every liquid with a powder. This includes, but is not limited to: foundation, concealer, eyeshadow, and eyeliner. Make sure your makeup artist knows this! It is pretty incredible how fast foundation can melt and slide off of your face, especially in the warmer climates!

DON'T go without setting spray! Trust me, you'll need it. Go see my blog post about setting sprays for more info. This saved my life on my wedding day!

and lastly,

DO carry the following in your wedding day bag:

  • Setting spray
  • Baby Powder
  • Eyelash glue
  • Lipgloss
  • Eyelash curler
Keep in mind these items are just on the beauty side of the day. You'll obviously have a large bag filled with all kinds of beauty essentials. As always, have fun! This is your day! Coming from a former bride, I had to best time of my life because I didn't sweat the small stuff. If something went wrong, I knew nothing about it. If I did know about it, I brushed it off. At that point, there's really not much you can do. Besides, your wedding day is about celebrating your marriage! Everything else is extra :)


Want to see more DOs and DON'Ts? Sound off in the comments!

INSTAGRAM: @angelamcollins (set to private, please request to follow)

xoxo, Ang

Saturday, January 25, 2014

Review: Benefit Cosmetics The POREfessional Primer

Hi Lovelies!!

Today's review has been a long time coming. I have been wanting this product for so long and FINALLY was able to purchase it after Christmas. It is the Benefit POREfessional Primer (Available here!)

Photos are from my phone, so I apologize for the low quality.


This product claims to minimize the appearance of pores while also filling them in and smoothing your complexion prior to foundation.

Here is what the consistency looks like:


Looks gross at first, huh? This is the original formula. I believe they make a few other formulas but they haven't received the best of reviews.
This product is pretty darn fantastic. I have a naturally dry, scaly nose (even though the rest of my face is oily). I applied this product after moisturizer, focusing on my nose, and BAM! No more large pores and no dry patches. When I applied my foundation, it glided on my skin so well. I seriously did not need powder afterwards. My foundation stayed on all day (which is no easy feat!)

Do you need this exact primer in your life? Well, not necessarily. I recommend something that has been circulating Pinterest for a very long time. It is the Monistat Anti-Chafing Gel (Available here!) I know it sounds weird, putting Monistat on your face, but it really does work! Maybelline also came out with a primer called Baby Skin that is another great drugstore option (Available here!). No matter what, I truly believe that you need a primer in your collection. It will seriously improve the wear of your foundation.

As with any primer, you want to make sure that you apply a moisturizer first. I typically moisturize and prime my face, then move onto the eyes, then apply my foundation. This gives the primer some time to settle into the skin so you're not moving it around with your brush/sponge.

Want to see more reviews??? Sound off in the comments!

Instagram: @angelamcollins (set to private, please request to follow)

xoxo, Ang


Tuesday, January 21, 2014

Setting Spray: What is it & Why do I need it?


Hi darlings!

So today I thought I would share some insight on some makeup setting sprays that I love. First off, I believe setting spray to be "hairspray for your face".
I got married in late June, on the hottest day of the summer (in Michigan). I would have melted all of my makeup off before the ceremony if it weren't for setting spray.

Today I'm going to compare 4 different sprays for you, so you don't have to feel the need to splurge on one.

From left to right:

Urban Decay De-Slick Oil Control Makeup Setting Spray (Available here!) - I have had this so long that they changed the bottle design. This spray is for oily skin and definitely does what it says. This is the spray that my makeup artist on my wedding day used, not only on me but on my bridesmaids as well. I'm not kidding when I say my makeup stayed on from 11:00 am on Saturday to 3:00 am on Sunday. My eyeshadow did not crease, my mascara did not run, my eyeliner did not melt, my foundation did not fade. This is amazing stuff. The best part about Urban Decay is that they make their sprays in travel sizes, so you can try all of the different finishes out.

NYX Cosmetics Matte Finish & Dewy Finish Long Lasting Setting Spray (Available here!) - This is a much less expensive alternative to the Urban Decay sprays. I have both finishes simply because my mood changes with my sprays. Some days I want a more dewy finish, some days I need my makeup matte. These sprays are very nice beginner setting sprays. However, they really need to upgrade the nozzle on these. They spray shoots at you like a torpedo, so it's not that great at covering your entire face, but it really does work. I'm glad that a company like NYX made setting sprays because they are hard to come by.

MAC Cosmetics Fix+ (Available here!) - This is first and foremost a vitamin skin refreshing spray. However, it does wonders for setting makeup. It also helps adhere loose pigments or glitter to the eyelid. Dip your brush into pigment/glitter, spray bristles with Fix+, and apply to lids. It also gives shimmery shadows a more metallic finish, which is SO cool. You may also spray this on the face before and after makeup, or on bare skin to refresh and replenish the skin. MAC also offers Fix+ in travel size, which is awesome because it is fairly pricey.

Now obviously there are other brands of setting sprays out there, like Model in a Bottle, Ben Nye Final Seal, and even ELF Cosmetics has a spray out. No matter what the brand, I feel that everyone needs a setting spray in their collection. Trust me, it will change your makeup game forever. Going to a summer wedding? Doing your own wedding makeup? You need it. It will make a difference between having your makeup fade within a few hours and having it last all day long.

As always, you want to spray it on your face about 6 inches away. Spray before foundation and allow it to dry before applying said foundation. Spray it after your entire look is complete, focusing on your eyelids to prevent creasing (especially if you have oily eyelids like yours truly). Do not overdo it. You only need maybe 3 or 4 sprays to do the job. If you overset your makeup, it will come off. Just trust the product and it will work it's magic.


Have a beauty question or concern? Let me know in the comments! :)


xoxo, Ang

Monday, January 20, 2014

Makeup Pictorial: Vibrant Purple/Pink Eyes w/Nude Pink Lip

Hi dolls!

So today's blog post is the first of it's kind. I am going to try my best to incorporate some pictorials to show you how to create certain looks. Today's look is inspired by Jennifer Lopez's makeup look from the American Idol auditions in San Francisco.


I have yet to find a photo or video of it. If anyone can find it, PLEASE let me know!

Let's get started!

First you will want to prime your eyelids. I am using the MAC Cosmetics Paint Pot in Painterly (Available here!). Swipe over your eyelid with your fingers:

 Next, you'll want to apply a white cream base so that the colors are at their most vibrant. I am using the NYX Jumbo Pencil in Milk (Available here!). Make sure to blend it out with your fingers as well:

 Now for the fun part. The shadows I'm using are from the BH Cosmetics 120 Palette 3rd Edition (Available here!). First, select a Lilac shadow and sweep it all over the lids:


Next you'll want to select a hot pink shade for your crease. I mixed these 2 shades and applied them to my crease:

 Then, to deepen the crease and add more variety of colors, I chose a vibrant purple and placed it in the outer "V" of my eye:
 Then, I took my Sigma E40 and blended everything out:

Next I took a pearly white color and applied it to my inner tear duct with my finger:
 Next, apply your eyeliner as desired. I chose Ulta Extreme Wear Gel Eyeliner in Primetime and did my signature wing:

Then I decided I needed something on my lower lash line, so I applied the same vibrant purple color from the crease:


 Then apply your mascara as desired. Be sure to visit my Mascara Routine post!
Now for that J-Lo glow. I'm using the Physician's Formula Mineral Glow Pearls to add highlight to my cheeks:


For the lips, I decided to go with a mixture of Revlon's Soft Nude and MAC Angel:

And here's the finished look!

And since I know people will ask, my nail color is OPI Feelin Hot, Hot, Hot and the accent nail is Essie Blanc with Sinful Colors silver glitter polish :)

I absolutely love this look. I think it is super fun and would look great on everyone!

I had a lot of fun making this for you. If you would like to see more pictorials, sound off in the comments!!!

xoxo, Ang

Sunday, January 19, 2014

Review: Urban Decay NAKED Illuminated Shimmering Powder for Face & Body

Hello lovely ladies (and gentlemen ;))

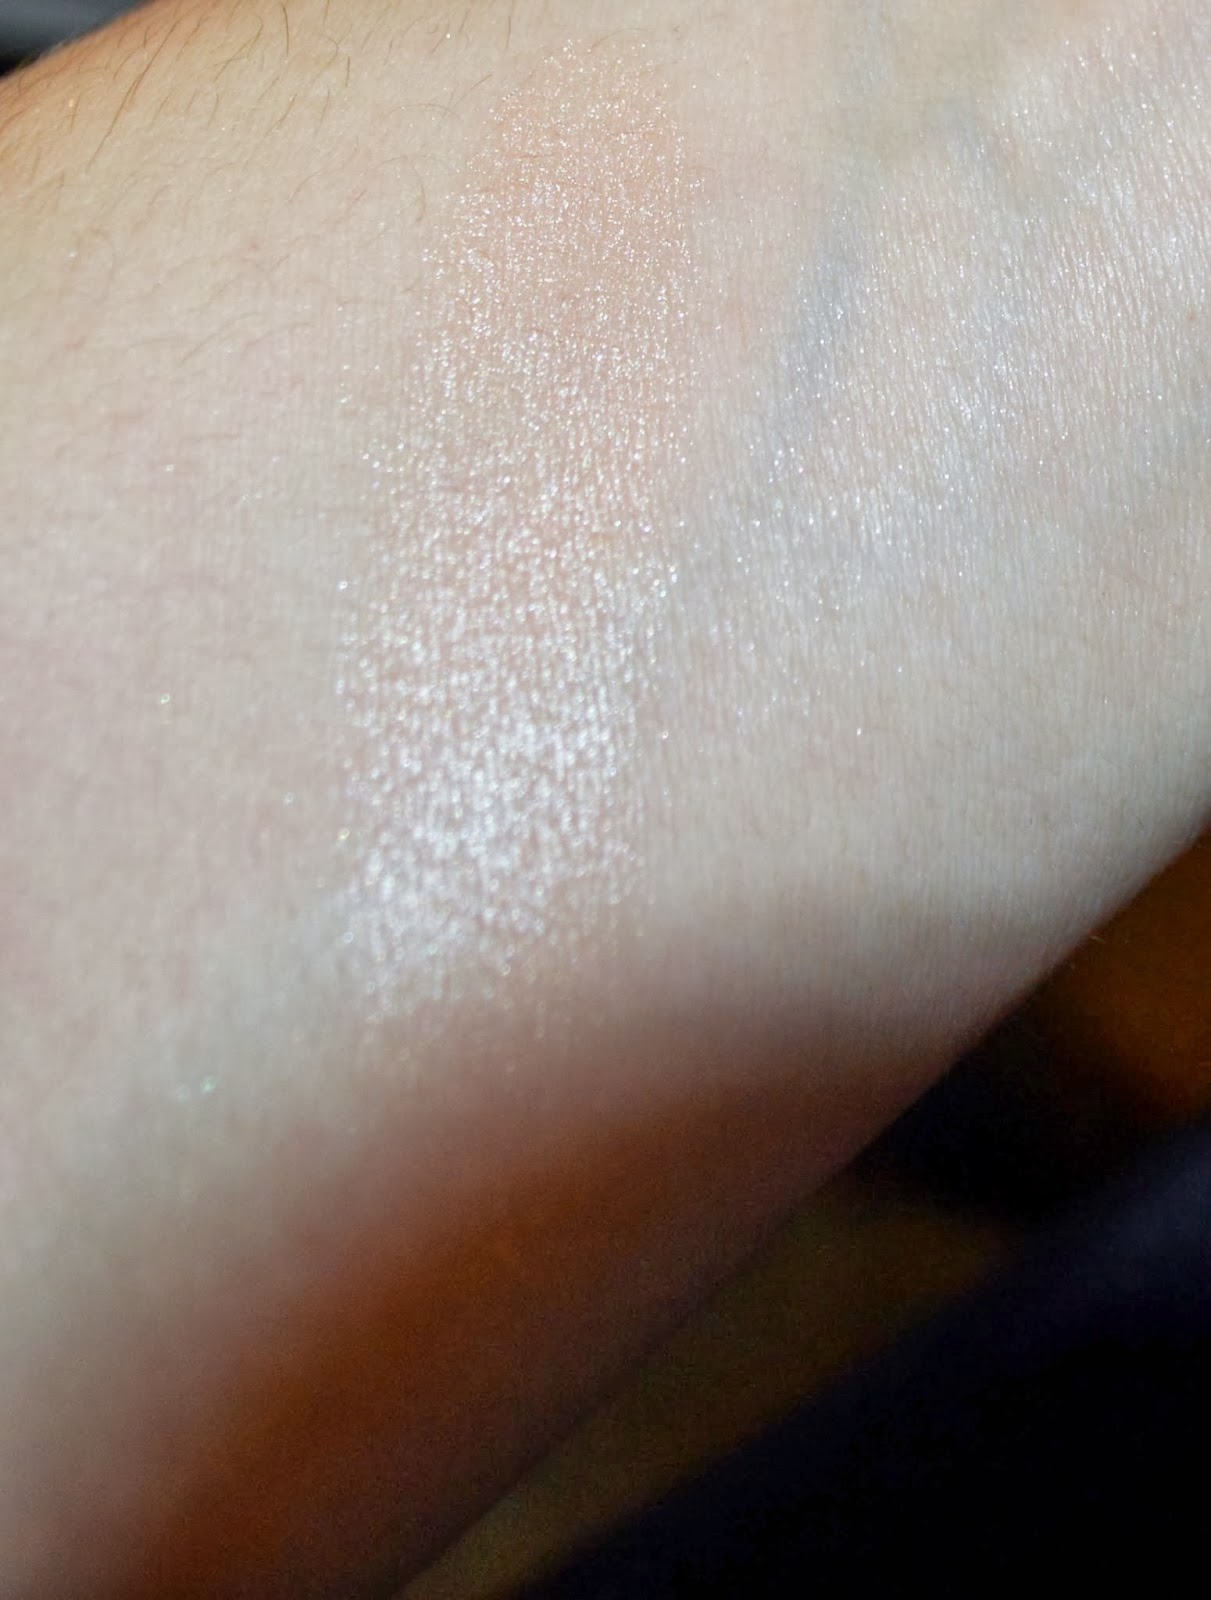
Today I am reviewing a fairly new product from Urban Decay. It is the NAKED Illuminated Shimmering Powder for Face & Body (Available here!):
This product claims to "create an instant glow". In the swatch above, it definitely gives off a lovely glow. However, if you want to blend the powder, the concentration of shimmer instantly goes away and kind of dusts off. Sure, it gives off a very lovely sheen to the skin, but if you are looking for a highlighter, this is not it.
I'm pretty sure this product was designed to just give a subtle amount to sparkle to places like your shoulders and collarbone. I just could not justify spending $29 on glitter. I was definitely expecting more from a brand like Urban Decay. Maybe they'll come out with an actual highlighter in the future.

If you are looking for more of a highlighter, I suggest the Physician's Formula Mineral Glow Pearls (Available here!):


This gives off the most amazing, pearly glow to anyone's cheekbones. I absolutely love it, and for half the price of the Urban Decay powder, it gives off much better results.

As I am writing this post, I have already returned the powder. What's the sense in having something in your collection that you will NEVER use, right? Plus, Ulta is extremely amazing and accepts products whether they are used or not. Unfortunately, I wasn't able to get my rewards points back, but oh well. Life goes on :)

Want to see more reviews like this? Sound off in the comments!!! And spread the word. I love new readers :)

xoxo, Ang

Saturday, January 18, 2014

The Showdown: Revlon Colorburst Matte Balm (Sultry) vs Jordana Twist & Shine (Honey Love)

Are you ready for this? The lip crayon phenomenon is being taken by storm, and almost every cosmetic brand has some form of lip crayon/balm/stain out there. Both of these products are good dupes for the Clinique Chubby Stick in Honey, and if I'm not mistaken, Clinique's Chubby Stick was the very first lip crayon of it's kind. I remember flipping through my Seventeen magazine and seeing the ad (and wanting them SOOOO badly!) Unfortunately, I can't justify spending $17 on a crayon unless I am able to actually color stuff with it.
Today we are comparing the Revlon Colorburst Matte Balm in Sultry to the Jordana Twist & Shine Moisturizing Balm Stain in Honey Love:

Left: Revlon Colorburst Matte Balm in Sultry (Available here!)
Right: Jordana Cosmetics Twist & Shine Moisturizing Balm Stain in Honey Love (Available at Walgreens or Available here!)

First is the Revlon Balm in Sultry:
This balm is a true matte. It is very drying, but SUPER pigmented. I put some lip balm on beforehand, just to keep my lips moisturized. This lasts ALL day, no joke. I have yet to try any other shades, but after using this one for a few days, I am dying to try more.

And here is the Jordana Balm in Honey Love:
This is fairly sheer, although the swatch on my forearm was pigmented. These are nice because they offer color payoff and moisture to your lips. However, these do not last all day. I usually get about 3 hours maximum wear out of these. I also have one in Cranberry Crush, but I currently cannot find it haha

So in conclusion, what one balm doesn't have, the other one does. Revlon's Matte balms are long-wearing, but contain no moisture, whereas the Jordana balms have plenty of moisture, but no longevity. These products are different in price (Revlon $8.99, Jordana $2.99), so I can see what the Jordana would have less pigmentation and staying power. Still, it is a less expensive way to get a sheer color to your lips, if even for a few hours.

If I were to pick one, I would choose the Revlon balm:
I am someone that can endure the drying effects of a matte lip product if it has great color payoff. However, if you have naturally dry lips, I would try their Lacquer balm. Once I get my hands on one, I will certainly review it for you :)

Wanna see more Showdowns of products? Sound off in the comments!

Follow me on InstaGram @angelamcollins (my profile is set to private, so please request to follow)


xoxo, Ang

Friday, January 17, 2014

My Mascara Routine

Oops, did I accidentally give you guys TWO blog posts today? ;) I figured I would spoil y'all today.

This one is requested by my friends and family so often, so why not share it with my loyal readers?

Here is my mascara routine :)

Let's begin with the products I use:
 Top left: L'Oreal Telescopic Shocking Extensions (Available here!)
Top right: Urban Decay Supercurl Curling Mascara (Available here!)
Bottom: L'Oreal Voluminous Butterfly Waterproof Mascara (Available here!)

 First up is the L'Oreal Telescopic Shocking Extensions. Here is the wand:
 These are fairly flexible bristles, and they provide lots of length to my lashes. Here is the difference when I apply two coats of this:
Quite the difference, huh?

Next is the Urban Decay Supercurl:
 And here is the wand:
 This has been a favorite of mine for years. It is the perfect curling mascara for me. Here is the added coat of this:
This makes so much of a difference in the volume of my lashes, as well as the curl.

Finally, I apply the Voluminous Butterfly to my lower lash line:
 And here is the wand:
 Pretty cool, huh? This is a more recent purchase for me, but I always apply a waterproof mascara to my lower lash line to prevent any smudging. Here is the difference when I apply this:
Now, I like my lashes to look a little "spider-like". However, if you do not, I suggest combing through your lashes after each coat to prevent clumping.
Next, I curl my lashes. Yes, i know, you're supposed to curl BEFORE mascara, but it honestly never works for me...
 And there's the finished look! Sometimes when I really don't feel like going full glam, this is what I do for makeup.

Oh! And I also got new glasses recently:
You like? They're actually purple even though the camera isn't showing the color that well.


Check back tomorrow for another wonderful post!!!


xoxo, Ang